Back to picture taking...
Do you take pictures of your product, art, family, then look at them and there too dark...too light...the color is off? Happens more than we like, huh? So let's take a look at some pictures I took for my
Etsy site.
A post or two back I showed you my set up but here it is again...
 |
| Wheeled cart set up for picture taking. |
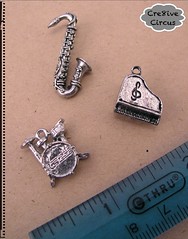
Even with all my lights and white box there is still room for improvement. Let me show you a picture of some of my charms for my supply shop straight from the camera and the photo box, taken inside.
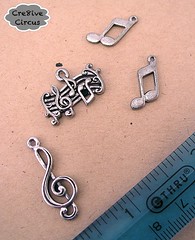
Here's another taken with the photo box but at midday outside. (I like these and they need very little help but you can't always be outside)
Different huh? Now the background for these is always the same. I have brown paper bag laid across the bottom of the box, a blue ruler for sizing (sometimes I also use a coin), and that's it.
Now I'm a Corel fan...my geeky husband picks on me about because he just cant understand why I don't use Photoshop but I've had Corel for a long time, I'm used to it, I like it and it likes me...that's all there is to it! And I think you should do the same! If you love Elements, use it! If you're a fan of PS then by all means use it. Find something that works for you and stick with it! It truly makes your time manipulating photos faster if you know and like your photo manipulation program. (that's my story...)
Lately I've been using Photogene on my Ipad (also comes for the Iphone)...also
very easy and you can change up your photos in front of the TV, bonus! So here's the first charm photo after a tour through Photogene.
Can you see the difference? Here's what I did...first I cropped the image to get it to be more of a close up making sure I left the ruler to show size. Under adjustments I increased the brightness and sharpened the photo by about 10%. Then I added my company name which is as easy as pushing two buttons and typing the name. Because I can I put the torn paper edge down the side and voila! Better photo to post to my shop. It's similar in Corel Photo Paint in that you up the brightness and sharpen, you can also add text in a multitude of fonts, don't have the paper edge available as easily but I'm sure it can be done, and I would also reduce the image resolution.
Remember if you are posting paintings or any kind of art that can be easily duplicated or copied to use
72 dpi (dots per inch) resolution and put some kind of
watermark across the whole picture! Very important! (not so much for my purposes here because this is resale) Okay one more...
 |
| Before... |
Huge difference. My only complaint when manipulating is that sometimes it changes the color, can you see it? The original is brown/tan, the after pic looks to me slightly peach/pink. I don't mind it enough to spend much time fixing it! Pink or not it still looks better than the first picture so...(and I missed the paper edge here! Whoops!)
Would love for you to share how you make your pictures better for your shop or website or shop? What program do you use? Pop in a link and show off your photo savvy!
Thanks and have a creative day!
Susan


2 comments:
Susan,
It was fun to see how you set up your photos! Thanks for sharing! I love Corel too! Been using it for years!
Thanks for sharing your tips with us!
Kris
Thank you for more photo taking tips! I am always amazed at the before and after shots, so thank you for including those side-by-side. I love outdoor photos too, but I am no fan of taking pics in the extreme temps here in the midwest, so I, like you will just keep taking my indoor shots and clean them up later. xo
Post a Comment